A Step-by-Step Guide to Implant Restoration
Implant restorations are a highly effective solution for replacing missing teeth, offering patients a durable, natural-looking option that restores functionality and aesthetics. They involve a process that combines the surgical placement of a dental implant with the creation and attachment of a prosthetic crown or other dental appliance. Take a look at this step-by-step guide to understand how implant restorations work and what to expect throughout the procedure.
Step one: Initial consultation and treatment planning
The implant restoration process begins with a consultation to assess whether the patient is a good candidate. The general dentist evaluates the patient's oral health, including the condition of the gums and jawbone—the primary determining factor of whether the implant will have ample support. The dentist may recommend a gum or bone graft if either factor proves insufficient. Should the patient prove ideal, the dentist will use imaging technology, such as X-rays or 3D scans, to plan the precise placement of the implant. Further, patients will choose between a crown (for a single missing tooth), dentures, or dental bridges for their implant restoration.
Step two: Implant placement
The implant placement will take place during another appointment after the initial consultation. It involves creating an incision over the area where the implant will go. This incision will allow the dentist access to the jawbone, where they will drill a hole to place the titanium implant. Finally, they will suture the gums over the implant and jawbone to begin osseointegration.
Step three: Osseointegration
Osseointegration is a few-month-long process that involves the implant fusing with the jawbone. During this time, the patient should refrain from disturbing the procedure site or eating crunchy, spicy, acidic, tough, chewy, and sticky foods—basically, patients will want to stick to a soft diet. A diet with soups, eggs, potatoes, yogurt, cheese, fish, etc. Further, patients must avoid all smoke, vaping, tobacco, and nicotine products throughout the entire process. According to the Centers for Disease Control and Prevention, or CDC, this significantly decreases the chances of slowed healing, infection, and implant failure.
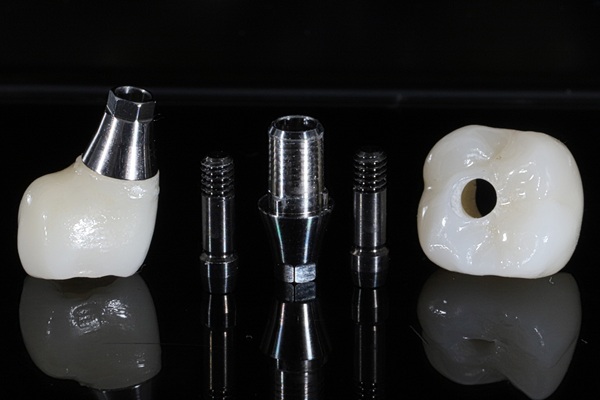
Step four: Abutment placement and designing the restoration
Once osseointegration is complete, patients return to the dental office for the abutment placement. The abutment is the titanium piece the dentist affixes to the top of the implant post. This process will require reopening the gum line—not the jawbone—for placement. Note that the abutment will jut out above the gum line to anchor the implant restoration.
Once in place, the dentist will record measurements of the abutment and the space between the abutment and surrounding teeth. Sometimes, they simply take a mold of the area. Lastly, the dentist will send the measurements and implant restoration choice, chosen in the initial consultation, to an offsite lab for fabrication. Patients may be fitted with a temporary restorative to guard the surrounding teeth and gums from the abutment.
Step five: Final placement
For the final appointment, the dentist will remove the temporary restorative and test the permanent implant restoration's fit. They will coach the patient through various bite tests to ensure comfort. If minor adjustments are necessary, the dentist will make them during the appointment before bonding it into place.
Schedule a consultation
Understanding the dental implant process is important, as it can be intricate and somewhat lengthy. Consulting with a skilled dentist ensures a seamless restoration journey and results that enhance oral health, function, and appearance. Contact Somerset Smile Studio to begin the first step in implant restoration.
Request an appointment here: https://www.somersetsmilestudio.com or call Somerset Smile Studio at (732) 649-1140 for an appointment in our Somerset office.
Check out what others are saying about our dental services on Yelp: Dental Implant Restoration in Somerset, NJ.
Related Posts
Traditional metal braces and Invisalign® are two of the most common options for teeth straightening. Continue reading to discover the differences between Invisalign and traditional braces. When deliberating between the two options, you might ask questions about their effectiveness and cost. However, the goal is to choose the treatment option that would get the best…
Invisalign® is a breakthrough orthodontic technology that uses a series of transparent aligners to enhance the look of crooked, overlapping, and gapped teeth. If you are considering using Invisalign for your orthodontic treatment, you may be curious about how often you would have to go for checkups and what happens during those appointments. Continue reading…
Patients undergoing Invisalign® treatment often want to know how long they will need to wear their aligners. Read on to learn how long the aligners need to be worn. Several variables determine the length of Invisalign treatment, and one of the most important is how long you wear your aligners each day.Invisalign treatment can take…
Invisalign® aligners are a popular alternative to conventional metal braces. Although Invisalign offers more comfort than metal braces, it is impossible to eliminate the chances of mild pain or discomfort. The risk of discomfort seems to be highest during the first week of wearing invisible teeth aligners.A person’s pain tolerance also determines the degree of…